Sunday, October 31, 2010

Spicy Thai Slaw and Lechon Asado


Disclaimer: no recipe for roast pig (lechon asado) here, just slaw. Every year, our friends Eric & Christal (and Eric’s dad) host a slammin’ pig roast. I think Eric and his dad have been doing this for 10+ years, but I haven’t been in the picture that long. This is not one of those affairs where a company comes in to roast a pig for you or the hosts purchase a pre-roasted porker. Eric puts the pig on a spit at 7am in his backyard and slow cooks the meat all day until chow time at dusk. It's real, and it's spectacular (for the non-faint of heart).

I decided I wanted to make some kind of cold salad to go with the melt-in-your-mouth pork, but not anything mayo based. Inspiration: spicy Thai papaya salad. (You may have already deduced that papayas did not make the cut for this version.)


I spent around 18 hours in Thailand. During that time, I think I managed to visit at least 9 food/drink establishments (admittedly, I’m counting bars in that tally). In fact, the only things I recall doing in Thailand are eating, drinking and looking for places to eat and drink. Oh, and we saw the reclining Buddha. He was pretty sweet. In our cultural defense, most of Bangkok was shut down due to an election. Not that I need to defend myself, because one of the best things about travel is tasting and learning about the local fare.

I was traveling with my friend Sam and we were on the very last leg of our trip, searching for our final authentic Asian meal before hitting the airport. We were pressed for time and ended up at little joint with a menu that looked like any menu you’d see at a Thai restaurant in the US. Except...the items on this menu tasted 100 kajillion times more delicious than the same items found in an American Thai restaurant (seriously, my mouth is watering right now thinking back on the meal). I had green curry with chicken and a spicy papaya salad. And when they say spicy in Thailand, they mean SPICY. Like, eyes watering, throat on fire kind of spicy - but so good, you can't keep your fork from making return trips to the plate.

The papayas used in this kind of salad are unripe or “green” (crunchy, not sweet), and unfortunately, I couldn’t find unripe papaya in DC on short notice. So I decided to use crunchy purple and green cabbage in its place. I scanned the internet for Thai salad recipes and pulled the ingredients that sounded good.


This little lady, Attie, was our houseguest for the weekend. She answered all my food questions and was surprisingly knowledgeable on southeast Asian cuisine.

ii

As you can see, finalizing this recipe was a labor of love. The result was exactly what I wanted. If I had been making this just for myself, I probably would have made it spicier, but the recipe as written works well for crowds.


Spicy Thai Slaw

Dressing
1/2 tsp. crushed red pepper flakes (or more to taste)
2 tbs. sesame oil (vegetable oil will work)
1/4 cup rice vinegar
1 tbs. sugar
1 tbs. soy sauce
2 tsp. freshly grated ginger
2 tbs. lime juice
1 clove minced or grated garlic
1 tbs. chili paste
1/4 tsp. salt
1/4 cup (handful) cilantro leaves

If you think of it, mix the red pepper flakes into the sesame oil several hours prior to making dressing so that the oil has time to infuse the pepper heat. Mix all ingredients in a food processor or blender until smooth.

If you need/want to substitute or eliminate things above, go for it. One recipe I came across used basil instead of cilantro. If you can't find chili paste, chopped Asian chili peppers would work. I definitely recommend using fresh ground ginger though. If you haven't used fresh ginger, it will change your life. This is what fresh ginger looks like in your grocery store and its very cheap. Slice off the brown skin and grate it on a microplane or the side of a cheese grater with tiny holes.

Salad
1/2 large head of purple cabbage, cut into strips
1/2 large head of green cabbage, cut into strips (or full head of one or the other)
4 scallions, thinly sliced (including the white parts)
1/2 red bell pepper, thinly sliced
1 barely ripe or unripe mango, grated (should feel hard when you squeeze it)
1/4 cup peanuts, crushed (a few pulses in a food processor)

Toss all salad ingredients except for peanuts with dressing. If you have the time, mix up the slaw and give the cabbage an hour or two to pickle in the dressing. Refrigerate until ready to serve. Toss again before serving and sprinkle with crushed peanuts.

Serves 10-12 as a side


Thursday, October 28, 2010

Last Chance Guac


Avocados are always in season. Guacamole, however, is not. Guacamole is for picnics, tropical vacations and summer barbeques in the backyard. There is something about warm weather that makes the avocados at the market scream “mash me up with lime juice and PUT ME ON SOME TORTILLAS!” Once cold weather hits, they just kind of gurgle and murmur like sleeping toddlers (which is fine for say, an avocado fated for creamy soup or sliced over a warm open-faced portabella sandwich). But guacamole calls for some seriously jazzed avocados.

Warm weather lasts for a long time in DC, but recently I got the feeling that I was looking at one of my last screaming avocado weekends before they settle down for the season (after all, technically it
is fall). The avocados - and fresh cilantro and tomato - did not disappoint for their final show. My super-slick avocado slicer swept through each half like a hot knife through butter, which is just how a ripe avocado should feel when cut. 


I’ve made guacamole at least a dozen times, and honestly, it doesn’t always taste good. If you get a bland or bitter batch, it’s probably not because you have a bad recipe, but more likely due to unripe avocados. My recommendation is if you can’t find ripe avocados, skip the guac until they’ve ripened. And while we’re on the topic of guacamole tips, to keep it from browning, place the avocado pits into the bowl until ready to serve.   

Last Chance Guac

2 ripe avocados (should be soft when pressed, but not visibly mushy)
1 roma tomato or 1/2 beefsteak, diced
2 tbs. fresh cilantro, chopped
2 tbs. jalapeño peppers, chopped
juice from 1/2 lime (roughly 2 tbs.)
salt and pepper to taste (I use 8-10 grinds of each)

To remove the avocado flesh, use a large knife to cut lengthwise around the avocado (cut into the avocado until you hit the pit and then rotate the knife around the pit). To separate the halves, hold each side and twist in opposite directions. To remove the pit, whack your knife into it and turn. The pit should come out easily (be very careful when removing pits from the knife because they are slimy buggers; wrapping the pit in a napkin before removing works well). If you don't have a handy dandy avocado slicer like the one pictured above, holding the avocado in your hand, run your knife through the flesh a few times in each directly without cutting the skin (essentially you are dicing the flesh inside the skin). Then scoop out with a large spoon.

Add remaining ingredients and mix with a spoon. If using fresh jalapeños (spicy!), thoroughly chop before adding. If using canned or jarred jalapeños (which lose some of their heat in the preserving process), a rough chop is fine. 

This recipe is for a small batch. Serves 4 as an appetizer with chips. If using as a condiment for fajitas or burgers, it should be enough for 8.

Monday, October 25, 2010

Surprise Strawberry Crumble


My (new!) husband Travis used to live in historic Annapolis, MD, just a few blocks from the adorably charming City Dock area. He lived in the bottom half of a house, and living in the top half was Brad. The first Christmas that I knew Brad, he met the love of his life, Sondra, at the now-defunct Christmas Light Run (campaign is ongoing to bring it back). A handful of months later, Brad and Travis both moved from Annapolis to Washington, DC at the same time to move in with their lady-friends. They even shared a moving truck (I know, so cute you want to barf, right?). And not surprisingly, some time after that, everyone got engaged.


The four of us dragged our feet, weighed down with the angry-monster thoughts of expenses and guest lists and trying to make sure your seventeenth cousin twice removed is going to be happy. B&S dragged their feet a wee bit longer than T and me. It was about five weeks before our nuptials that Brad mentioned they still hadn’t made any decisions about a wedding. A week later, I got an invite to a bridal shower for Sondra. Had I not read the invitation very carefully, I would have missed the fact that the bridal shower was to precede a wedding scheduled for TWO WEEKS LATER. Surprise! That’s right folks, these two went from zero to married in just a few weeks (me, as I glued the 478th paper bird to a program: $%*#*@% jealous). Their wedding was perfect and they both agree that it couldn’t have been done any other way.

We only just were able to have Brad and Sondra over for dinner since their surprise wedding. To cap off the evening, I served individual strawberry crumbles. The surprise in this dish is the addition of raspberry balsamic vinegar, which gives the cooked strawberries a lively little tang.  Because the crumble is relatively light on sugar, it’s a perfect dish to play up the sweet and sour flavor of berries (any blend of strawberries, raspberries and blackberries would do here).


Surprise Strawberry Crumble

Filling:
1.5 qts. strawberries, cut into quarters (if using frozen, thawed and drained)
1/4 cup brown sugar
1 tbs. raspberry balsamic vinegar

Preheat oven to 350 degrees. Mix berries, sugar and balsamic vinegar. Divide evenly among four ramekins or pour into a single loaf pan. This dish is just as tasty using frozen strawberries, but you must thaw and drain the berries. Otherwise you'll end up with strawberry soup (which may not be altogether bad, but not what we're going for here). I used my own fresh berries that we had frozen. If you use store bought frozen berries, make sure they don't have any sauce or added sugars.

Topping:
1/2 cup whole wheat pastry flour
1/2 cup quick cook oats
1/4 cup brown sugar
3/4 tsp. cinnamon
1/4 cup (1/2 stick) butter

Mix dry ingredients together. Incorporate butter with your hands. Spread topping over the strawberry mix. Bake at 350 degrees for 35-40 minutes. Filling should be bubbly. Top these babies off with a scoop of vanilla ice cream or dollop of fresh whipped cream with vanilla extract.

Serves 4

Thursday, October 21, 2010

Welcome Cookies with Lots of Oats & Chocolate


Nothing takes me home like chocolate chip cookies (C3s). Not because my mom baked lots of cookies or because I’ve got some secret family recipe passed down for generations. There is just something about the smell of C3s baking in the oven that makes me want to be having a sleepover with my g-friends at my parents’ house in upstate New York. I can’t pinpoint why, though I have a sneaking suspicion it is in large part due to the 1980s Nestle Toll House ad campaign (I fancy myself as the cute one with the pigtails, but really I was the girl with the giant glasses and bad haircut). Anyhow, that’s what this blog about. Home, family, friends and sharing (and sweets and sleepovers and vintage commercials). 


I realize now, several posts in, that I haven’t taken the time to properly welcome everyone to Shared Bites. No time like the present! And it seems only fitting to welcome readers with this recipe. These oatmeal C3s were born during a phase where I only wanted to make vegan cookies. (Rewind: lots of duds during that phase. Not because it’s hard to make a tasty vegan treat, I was just using the wrong avenues. But that’s a story for another day.) Admittedly, they aren't always vegan anymore, but both versions taste almost identical and are equally quick and delicious. Both options provided below; vegan ingredients in parentheses. These cookies are chewy and flavorful and amazingly decadent for a cookie with no butter.

And with that, I welcome you to Shared Bites. Share on.

*A quick note about oatmeal. Sometimes you'll read recipes that specify whether to use old fashioned oats or quick cooking oats. As a general rule, I purchase quick cooking oats because I have found them to be better for cooking and baking (pancakes, bread, cookies). But there have definitely been times when I've found myself with only old fashioned oats (like when I put "oats" on the grocery list and my sous chef was doing the grocery shopping - lesson learned). Not a problem.


The photo above shows old fashioned oats on the left and quick cook oats on the right. The difference goes beyond just oat size (quick cook oats are processed further than old fashioned oats), but for my purposes, tossing old fashioned oats into a food processor or mini chopper does the job. So use whichever oats you have/like. (Disclaimer: some people who are not me feel very strongly about using old fashioned, unprocessed oats. Please don't share this with those oat nazis.)


Oatmeal Chocolate Chip Cookies

1.5 cups whole wheat pastry flour
2.5 cups oats
1 tsp. salt
1 tsp. baking soda
3/4 cup canola or vegetable oil
1-1/3 cups sugar (I like turbinado here A LOT. Big sugar crystals and oatmeal come together for an awesome consistency.)
2 tbs. skim milk (I usually use plain rice milk; soy is also fine)
1 egg (or 1/2 thoroughly mushed banana or 1/4 cup applesauce)
1.5 tsp. vanilla 
1 cup chocolate chips (I use Whole Foods 365 Vegan Chocolate Chips)

Preheat oven to 325 degrees. Mix flour, oats, salt and baking soda. Add chocolate chips (recipe calls for 1 cup, which makes for a very high chip-to-cookie ratio; feel free to reduce).

Mix sugar and oil. Add milk, egg and vanilla to sugar and oil. Combine wet and dry ingredients. You won't get a typical cookie "dough," which is normal. As pictured above, the dough remains pretty wet. Because of the wetness of the dough, a structured scooping tool is supremely helpful. I use a medium cookie scoop (which works just like an old fashioned ice cream scoop). Before I had the cookie scoop, I used a tablespoon to get uniform cookies (though a bit small). Scoop dough onto ungreased cookie sheet.

Bake for 13-14 minutes at 325 degrees if using a medium cookie scoop; 10-12 minutes if scoops are tablespoon-sized.

Makes 40 2" cookies (I usually make a half batch. Yes, this requires half an egg - whisk one egg in a separate bowl and do your best to eyeball half the egg into the mix.)


Monday, October 18, 2010

To Scone or Not to Scone (Cranberry Orange)


Sundays in the fall for me mean group trail running at Rock Creek Park, followed by a sweaty brunch, often hosted at one of the runners’ homes. Last week was hosted by Mr. Sean W. (Sean served up some fancy-pants dill crêpes with smoked salmon and capers . . .  to 12 people . . . immediately after a workout.  Talk about a classy and well-prepared chap!) I always want to contribute when someone else is hosting brunch, but I was limited by the fact that whatever I brought had to be ok sitting in a warm car for two hours. I settled on scones.


My experience to date has led me to believe that you are either a scone person or you’re not. I happen to love scones. I think a nice dry scone with cappuccino on a fall day is about as delicious as it gets (and a treat that seriously knocks my socks off is a plain scone with lemon curd and clotted cream, à la high tea in England). Some people, I have discovered, have a strong anti-scone sentiment and can’t comprehend why someone would ever choose a scone over a muffin. I’m not going to try to change those minds - it’s their loss. But the existence of scone polarity made me think long and hard about variations in scones and what kind of scone I wanted to make. Dry or moist; glazed, sugared or plain; eggs or no eggs? Ultimately, some of my decisions were made for me (e.g., a few scones got a little crispy in the oven due to my inattention and glaze became a must).


These scones were actually kind of difficult to make. Or, rather, I should say that my expectations were not on par with the actual process of making scones. I was envisioning a nice firm dough that I could roll out with ease and artfully chop into triangles, the way you would find them at a bakery or coffee shop (triangles, g-d-it, I wanted triangles). Uuuuuuuum, not the case. This particular dough is VERY sticky and a bit difficult to shape. (You'll notice that there are no photos of the rolling and cutting process because I was too busy swearing at random items on my countertop.) If you don't have triangle-shaped-scone-obsession like me, you can do drop scones, which are much easier (and described below). Whichever you choose, the taste of these babies is spot on.


To find the perfect scone recipe, I did a little reading and then turned to my friends Ina (Garten) and Tyler (Florence). Neither of their recipes was exactly what I wanted, so I fashioned an amalgamation of sorts. Might this inexact science have led to my shaping difficulties? Possibly, but the finished product was so tasty that I don't regret a thing. In retrospect, maybe I should have turned to Nigella Lawson or any British person. I think they have scone-making in their blood. That and a love for weird brown sauce.


Cranberry Orange Scones with Citrus Glaze
adapted from a combination of this Ina Garten recipe and this Tyler Florence recipe

Scones
1-1/4 cups whole wheat pastry flour
1-1/4 cups unbleached all-purpose flour
1 tbs. baking powder
1 tsp. salt
1/3 cup sugar
1/2 cup (1 stick) cold unsalted butter, cut into chunks
1/2 cup heavy cream
1 egg
zest of 1 orange
juice of 1/2 orange 
1/2 cup dried cranberries
extra flour for rolling

Preheat oven to 400 degrees. Sift together flours, baking powder, salt and sugar. Cut in cold butter using a pastry blender or your hands (I find using my hands is most efficient). The result should be crumbly. Tyler suggested cutting the butter into the mix "using 2 forks." This suggestion is a joke. If you don't believe me, try the fork method. Then I will laugh at you.

In a separate bowl, mix cream, egg, orange juice and zest. Slowly incorporate wet and dry ingredients. Fold in cranberries.

For triangles: Generously flour a cutting board or whatever surface you like for rolling dough (I use silpats). Roll out dough to about 1/2 inch in thickness. I used lots of extra flour during this process. One helpful trick is to place a piece of wax paper on top of the dough while you roll - this leaves your roller clean for continued rolling. You should then be able to peel the wax paper off pretty easily.

For drop scones: Using a large spoon, scoop out large helpings of dough and plop down onto an ungreased cookie sheet. Flatten down a bit so that they are loosely shaped like biscuits and uniform in size (this will help with even cooking).

Bake for 15-20 minutes at 400 degrees or until the edges just start to brown. Place scones on a baking rack and let cool for 10-15 minutes before glazing.

Glaze
1/2 cup powdered sugar
2 tbs. fresh squeezed orange juice (from remaining half of orange)

Whisk powdered sugar and juice together. These measurements are a starting point. Depending on the humidity in your house, your taste in glaze consistency and the alignment of Saturn's moons, you will probably have to add more of the sugar or juice. You'll want a glaze thick enough so that it stays on the scones, but not so thick that you can't pour or spoon it onto the pastries. If you're having trouble, err on the thicker side - you can always spread it on with a knife, but you can't scoop runny glaze off the countertop (though I probably wouldn't question you if you did).

Once scones have cooled for 10-15 minutes (they should be a little warm, but not hot), pour or drizzle glaze onto scones. High-five yourself for a job well done.

Makes 18 scones

Thursday, October 14, 2010

Babies Call for Lemon Lime Bars, Obviously


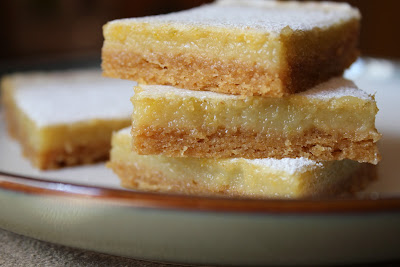
These bars are the best dessert I’ve ever made. True story. The mix of lemon and lime was inspired by one of the first food blogs I ever visited, Technicolor Kitchen (the author lives in Brazil and is always doing amazing things with fruit), and adapted to fit my love of whole wheat pastry flour (WWPF) and shortage of citrus juice.  WWPF lends itself more easily to baking than regular whole wheat flour, and, in my humble opinion, its flavor is so much better than white flour. WWPF just has more personality. It’s like the Stephen Colbert of flours. I have yet to substitute whole wheat pastry flour for white flour and get a bad result.  

This batch was for the mom and dad of Mikayla, the newest baby on the Hill (confirmed: she’s gorgeous). Mom and dad seem pretty chill about the whole parenting thing, aaaaaand I love it. Kind of like I love these bars. Illustration: dad Chad always said he’d be back out for Saturday morning bike rides right after baby M was born; the peanut gallery thought he was nuts. I’m pretty sure Chad was back in the saddle before his little girl turned a week old. Mom Kirsten probably won’t be long to follow (but we cut her a little slack considering she DID birth a child).

Lemon lime bars are super easy. And should you have only lemons or only limes that you want to use up, go for it (the base for this recipe is actually straight lemon bars). My number one tip is that if you don’t have a handheld citrus juicer (like the one pictured above), buy one. Now. You will never regret it. I balked at the fact that it cost $12, but I’m telling you, it paid for itself in spades. It juices and strains all in one and it gets every last little drop of juice out of your citrus fruit. Look, you can get yours here for even less! The one limitation is size - sadly, it's too small for navel oranges. But it will handle all your lemon, lime, tangerine and clementine juicing needs like a dream (because everyone has tangerine juicing needs, duh).


So let's all send Mikayla some Xs and Os and enjoy some lemon lime bars.  
 

Lemon Lime Bars with Whole Wheat Crust
adapted from lemon bar recipe in Baking Illustrated (by the Editors of Cook's Illustrated magazine)

Crust
1 stick unsalted butter, melted
1/3 cup sugar
1 tsp. vanilla extract
1/2 tsp. salt
1-1/4 cup whole wheat pastry flour

Preheat oven to 350 degrees. Combine melted butter, sugar, vanilla and salt. Add flour and mix until incorporated. Line a 9x11 pan with aluminum foil (for thicker bars, use 8x8 pan and expect longer cooking times). I used cooking spray on the foil, though it probably wasn't necessary - baker's choice. The pan does not need to be fully lined, but the foil should hang over the two long ends of the pan so that the bars can be removed from pan prior to cutting. Press crust into lined pan and bake for 20-25 minutes or until light brown.

Filling
1 cup sugar
3 tbs. whole wheat pastry flour
3 eggs + 1 yolk
zest and juice of 1 lemon
zest and juice of 1 lime
pinch salt
powdered sugar for dusting

Mix sugar and flour. Whisk eggs and stir into sugar and flour. Stir in zest, juice and pinch of salt. The original recipe I used called for 2/3 cup total fruit juice. My fruits produced less juice than this and it was fine. If the fruits seem firm at the store, maybe grab an extra one or two lemons/limes to supplement the juice (or if you like a more tart bar). Pour topping onto hot crust and put in the oven for another 15-20 minutes. Filling should be mostly non-jiggly. 

Let bars rest in the pan for 20-30 minutes after baking, then lift out using the foil edges. Let cool fully on a baking rack before cutting (bars will firm up a lot). Dust with powdered sugar. Dusting after cutting creates a bit more of a mess, but it allows you to cover any nicks from cutting.

Makes 15 bars

Sunday, October 3, 2010

Curried Chickpea and Roasted Butternut Squash for Champions


Last weekend, I arm wrestled a large, angry roller derby girl who was so aggressive, she was foaming at the mouth (truth: she was large, but actually quite congenial and definitely not foaming at the mouth). It was a hard-fought battle. 
 
Said arm-wrestling took place at the annual H Street Festival in a rapidly-gentrifying section of Northeast DC known as the Atlas District. Over the past few years and up until about a year ago, H Street, NE had developed an enclave of cool, kitschy bars that attracted a modest but healthy crowd (gems: Palace of Wonders, Granville Moore’s). Very recently, however, shops and restaurants have started springing up in every lot between 8th and 14th Streets. As a result, the festival was CROW. DED.  In a good way. In a diverse way. The way that reminds you that you really are part of a giant city with millions of people who live their lives in all sorts of awesomely different ways (because sometimes DC can feel empty, like downtown on weekends, and buttoned-up, like my office everyday). 


Participating in the festivities were the DC Roller Girls. For $1, you had your choice of Roller Girl to arm wrestle (unfortunate: somehow I got hosed into picking the RG that hadn’t been picked to wrestle anyone yet...ummm, for a reason). But I was undeterred. Earlier that day, I had prepared - and snacked on - my absolute fave salad of roasted butternut squash and chickpeas for a post-festival BBQ at my friend Joe’s. Joe very presciently invested in a home near burgeoning H Street about a year ago. Butternut squash is colorful and fibrous and full of anti-oxidants (how could I lose, right?).

Wrong. Despite the power-squash and the many hours I’ve logged pumping iron (truth: zero hours logged pumping iron), I lost. Next time I’ll wear skates.


The best thing about this dish is that as long as you get good butternut squash, it doesn’t matter what spices you add, this dish will taste good. Swap out the curry for fresh cilantro and you have a tasty Latin dish. Use cardamom and cinnamon, and add a little soy milk or cream for a winter warmer. Yum.

                          
Curried Chickpea and Roasted Butternut Squash

2 cans chickpeas
2-3 cups fresh or frozen butternut squash (fresh is best!), cubed
1 medium yellow onion, diced
1 roma or 1/2 beefsteak tomato, diced
2 cloves garlic, minced
1/4 tsp. ginger
1/2 tsp. cayenne pepper
1-1/2 tsp. cumin
2 tsp. curry (I used yellow, but any curry works)
salt and pepper to taste
olive oil, lots
1/4 cup water

Preheat oven to 350 degrees.  Drain and rinse chickpeas; toss with olive oil until lightly coated.  Roast chickpeas for 10-15 minutes (remove when chickpeas start to split open). 

In a deep pan or stockpot, heat 3 tbs. of olive oil over medium heat and add diced onions.  Cook onions until soft.  Add garlic and cook for 3-5 more minutes.  Add squash and cook for another 15 minutes or until squash can be broken down with a spoon.  Add spices and 2 tbs. of oil and mash squash fully with spoon or potato masher (mash to whatever consistency you like; I like mine a little lumpy).  Add chickpeas and 1/4 cup water.  Mash chickpeas roughly. Finally, add tomatoes and stir to incorporate.
 
Feel free to add oil as needed throughout the cooking process. Serve in a pita, over greens or by itself. 

Serves 8-10 as a side dish or 4-6 as a main course. 


Related Posts Plugin for WordPress, Blogger...